Showing posts with label car pc. Show all posts

Sunday, January 4, 2015

RaspberryPI CarPC tutorial


1. Installation process(fresh install):
- write a fresh image with the RaspbianOS. Latest known working version is http://downloads.raspberrypi.org/raspbian/images/raspbian-2015-02-17/
- copy the carpc folder in /home/pi/ on the SD card(get the latest release archive from my Downloads page/updates)
- plug the image in RPI, connect an USB keyboard and start it
--- use the auto menu to expand file system
--- change user password
--- enable ssh, disable overscan, disable serial messages
--- change Internalisation Options -> Locale and Timezone to your country
--- expand disk size to at least 4GB
--- enable Boot to Console(mandatory)
- restart
- type cd /home/pi/carpc/ and then ./carpc-install.sh and then wait for the system to install
- after this, you should reboot(sudo reboot) and the system should start

2. Calibrate the touch screen
Forget about xinput-calibrator and X11 calibration metods.
If you have calibration file(/home/pi/touchscreen_axes_calib) from a previous installation you can use it(put it in /home/pi/).
If you don't, then use the touch screen calibration plugin. This plugin works if you set correctly the Raspberry PI resolution in /boot/config.txt. Follow the steps in this video.

3. Add a map for navigation
Go to Navit Planet Extractor and download a .bin file for your area.
Copy the .bin file in your RPI card in /home/pi/.navit/ folder. Rename the .bin file to map1.bin.

4. Setup the GPS receiver
Open the file /home/pi/startup/StartCarPC and find the line gpsd /dev/ttyAMA0
Replace /dev/ttyAMA0 with your gps device file name. Here is how to find the file name:
  1. For USB devices. After plugging the device into the usb port type dmesg and you should see somewhere that a new device was mapped on /dev/tty... Most probably the file name would be /dev/ttyACM0.
  2. For Serial(UART) modules, using UART TX/RX pins the device will have the file name /dev/ttyAMA0.
You can test that the device is connected to a file name by calling cat /dev/ttyAMA0, for example and you should see some NMEA output.

5. Voice configuration for Navit
Each time a road indication has to be made, Navit will execute the file /home/pi/.navit/speech.sh with the indication text. This file will play a sound and the speak the indication, through speakers.
    aplay -r 44100 /home/pi/.navit/notification3.wav & sleep 0.7 && espeak -ven+f4 -s150 -a 150 -p 50 "$1" --stdout | aplay
    /home/pi/.navit/notification3.wav - the sound that will be played each time before an indication
    -ven+f4 - female voice number 4
    -s150 - speed 150 words per minute
    -a150 - amplitude
    -p50 - pitch
You can find more settings in the espeak manual
If you don't want the voice guidance you can press the speaker button in Navit and it will be turned off.

6. Add FM Radio module, physical buttons or physical rotary encoders
Here is my hardware schematic containing:
 - SV1 - Raspberry PI B, B+ connector
 - RADIO - SI4703 breakout board
 - RE1 and RE2 - two rotary encoders
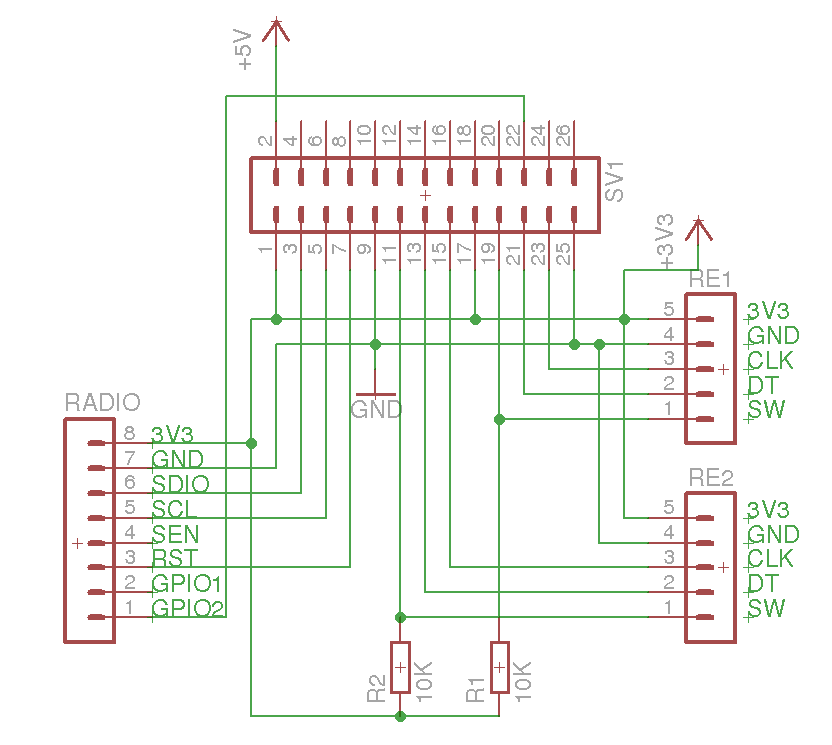
CarPC hardware set-up example
Each function of push buttons, rotary encoders can be configured using the Controller, like in the step below.

7. Configure the Controller
Modify the configuration file(/home/pi/config/gpio_description) like in this post.

8. Connect two audio sources(RPI and Radio) to one amplifier
In order to correctly hook up two audio sources together for a single output you have to use a small mixer. I am using the last schematic from this document: http://www.rane.com/pdf/ranenotes/Why_Not_Wye.pdf

9. Set the car logo in the Home screen
Put your car logo .png image in /home/pi/config/logo.png.

10. Skin
Thanks to Doru we have CarPC-touch_carbon.

11. Issues
The forum is available for any issues/suggestions.


Have fun!
Andrei

Sunday, November 23, 2014

Raspberry PI CarPC November 2014 updates

Hi,

I have made a new release of the CarPC software for Raspberry PI.
Updates:
 - RDS radio support(new radio application)
 - new application for managing everything on GPIO which takes about 3% of cpu(gpio interrupts are now used instead of polling mechanism)
 - new FM Radio XBMC addon
 - kernel 3.17.0
 - optimised Navit and XBMC priorities to remove hang times

Minor issues:
[Radio FM addon]: I tried different ways to set the height of the height of an item in xbmcgui.ControlList but it seems that nothing is working(I have tried adding as a parameter and also using setItemHeight). If you have any other idea please let me know.

In order to have RDS working pin22(GPIO25) from RPI should be connected to Radio(SI4703) GPIO2 pin. This is the full schematic for one SI4703 radio module and two rotary encoders:

Grab the latest update from here.

Installation instructions are in the README inside the archive. Don't forget to(sudo apt-get update & sudo apt-get upgrade).
For any issues please use the Forum to avoid filling this blog with comments.


Have fun and keep your eyes on the road while driving!

Sunday, September 28, 2014

Raspberry PI CarPC September 2014 updates

Hello!

I have made some progress on my CarPC project and here are the main changes:
- support for Raspberry PI Model B+
- update XBMC to 13.2 stable
- update kernel to 3.16.0
- reworked radio(rds is available but not yet enabled because of some high cpu usage - will fix this shortly)
- update system available(only ~150MB for download instead of a whole image)
- file system restructuring
- new skin
- forum released(Engineeryng-Diy Forum)

First of all the installation process(this is only for a fresh install, update coming soon):
- write a fresh image with the latest Raspbian from http://www.raspberrypi.org/downloads/
- copy the carpc folder in /home/pi/ on the SD card(gt this folder from my Downloads page/updates)
- plug the image in RPI and start it
--- use the auto menu to expand file system
--- change password to 'a'
--- enable boot into desktop-> Desktop Log in as user 'pi' at the graphical desktop
--- enable ssh, disable overscan, disable serial messages
--- Change Internalisation Options -> Locale and Timezone to your country
- connect a keyboard and open the terminal or connect using ssh
- change user permissions for pi: sudo chmod -R a+rwx /home/pi
- type cd /home/pi/carpc/ and then ./carpc-install.sh and then wait for the system to install
Note! If you get Cannot mkdir: Permission denied running this script then you should type sudo chmod -R a+rwx /home/pi/carpc/ and then run the script again.
- after this, you should reboot(sudo reboot)

Calibrate the touch screen
Forget about xinput-calibrator and X11 calibration metods.
If you have calibration file(/home/pi/touchscreen_axes_calib) from a previous installation you can use it.
If you don't, then use the touch screen calibration plugin. This plugin works if you set correctly the Raspberry PI resolution in /boot/config.txt. Follow the steps in this video.

Add a map for navigation
Go to Navit Planet Extractor and download a .bin file for your area.
Copy the .bin file in your RPI card in /home/pi/.navit/ folder. Rename the .bin file to map1.bin, map2.bin, map3.bin or map4.bin.

Setup the GPS receiver
  1. For USB devices. After plugging the device into the usb port type dmesg and you should see somewhere that a new device was mapped on /dev/tty... Most probably the file name would be /dev/ttyACM0.
  2. For Serial(UART) modules. The device will have the file name as /dev/ttyAMA0.
You can test that the device is connected to a file name by calling cat/dev/ttyAMA0, for example and you should see some NMEA output.
Now, copy this file name and put it in the file /home/pi/StartCarPC in the section:
    # Start gpsd
    # /dev/ttyAMA0 - RPI serial port
    # /dev/ttyACM0 - usb port
    sudo killall gpsd
    gpsd /dev/ttyAMA0

Voice configuration for Navit
Each time a road indication has to be made, Navit will execute the file /home/pi/.navit/speech.sh with the indication text. This file will play a sound and the speak the indication, through speakers.
    aplay -r 44100 /home/pi/.navit/notification3.wav & sleep 0.7 && espeak -ven+f4 -s150 -a 150 -p 50 "$1" --stdout | aplay
    /home/pi/.navit/notification3.wav - the sound that will be played each time before an indication
    -ven+f4 - female voice number 4
    -s150 - speed 150 words per minute
    -a150 - amplitude
    -p50 - pitch
You can find more settings in the espeak manual
If you don't want the voice guidance you can press the speaker button in Navit and it will be turned off.

Configure the Controller
The controller can be easily used with Steering wheel controls or other physical controls in your car.
You can set the configuration file like in this post.

Change the car logo in the Home screen
The car logo is a png file in /home/pi/config/logo.png.

New skin
Thanks to Doru, a new skin is available: CarPC-touch_carbon.

Comments moving to forum
From now on, a forum is available for any issues/suggestions(http://engineeringdiy.freeforums.org/). Due to this, comments on this blog will be disabled.

Have fun!
Andrei

Sunday, April 13, 2014

Raspberry PI CarPC April 2014 updates

Hello!

I have made a lot of work on the project, with great help from Doru Ignat(idorel@gmail.com) and now the complete list of features is:

  • latest Raspberry PI firmware(which supports new models and has fixes for analog sound - no pops any more, you can use the analog out of RPI)
  • linux kernel 3.10.30 with various touch screens support and also lirc
  • reworked XBMC CarPC skin
  • XBMC 13 Gotham beta3(1080p video support, any music and picture format, support playing from archives and more)
  • reworked XBMC touch screen calibration algorithm
  • XBMC calibration plugin for touch screens(eGalax and others)
  • reworked FM Radio plugin
  • latest Navit build from source
  • fixed Navit to alllow using espeak for speech guidance
  • support for WIFI(Airplay, XBMC remotes)

The latest image can be downloaded from the right side of this blog, from the Downloads page.

Cost of the needed hardware parts: 193$
  - Raspberry PI model B: 45$
  - 7 inch display with touch screen for car reverse: 80$
  - HDMI male to HDMI male golden plated cable: 5$
  - 8GB SDHC card: 6$
  - 5V(2A) micro USB charger: 3$
  - Columbus V800 GPS module(or any other): 37$
  - SI4703 FM Radio breakout board: 13$
  - 2 rotary encoders: 4$

After installing the image on an sd card, you have to configure the system for your needs.

Calibrate the touch screen
The touch screen calibration involves two steps and you need a keyboard connected:
  1. Calibrating the touch screen for X11 applications(like Navit). Open the terminal from Desktop and type xinput_calibrator and follow the indications. After the calibration is completed you have to put the output in a file to make this permanent:
    sudo nano /usr/share/X11/xorg.conf.d/01-input.conf
Put here the output of xinput_calibrator. It will be something like:
    Section "InputClass"
        Identifier    "calibration"
        MatchProduct    "eGalax Inc. USB TouchController"
        Option    "Calibration"    "121 1917 317 1741"
        Option    "SwapAxes"    "1"
    EndSection
  2. Calibrating the touch screen for XBMC. In XBMC use the keyboard to go to Programs/Touch Screen Calibration and follow the informations on screen.
Note, that in order to make a better calibration you can move the finger on screen towards the point, before pressing enter(as can be seen on minute 0:52 in the video).
Touch each point and then press enter to go to the next one. At the end, you have to unplug the touch from usb and then plug it back(works on XBMC Gotham).
After this, he calibration is stored permanently in the file /home/pi/touchscreen_axes_calib. You can edit this file to fine tune the position of the cursor if the calibration isn't perfect.
    calib_x_d and calib_y_d - control the cursor displacement up/down/left/right
    calib_x_fact and calib_y_fact - some factors obtained in the calibration process(don't edit them)
    click_confines - defines the area that will be used for click(if the touch moves outside of this area then a drag action will occur) - this area is measured from the first touched point
    touch_mouse - if you want to use a mouse you have to set this to 0, but some touch screens behave as mouses and you have to set this to 1 in order for them to work(with single click). For the most of the touches this can be 0 if you want to also use a mouse, but if you don't want to use a mouse it doesn't mater, let it be 1.


Change the resolution
[XBMC] Using ssh you have to edit the file /home/pi/.xbmc/userdata/advancedsettings.xml and set your resolution. After this restart the whole system and XBMC should run with your new resolution.
[LXDE] Connect with ssh and type
tvservice -mDMT && tvservice -mCEA
and get the desired resolution mode
Edit /boot/config.txt and modify according to your preference, for example:
hdmi_group=2
hdmi_mode=27
CEA group is 1 and DMT 2.

Add a new map for Navit
  1. Go to Navit Planet Extractor and download a .bin file for your area.
  2. Copy the .bin file in your RPI card in /home/pi/.navit/ folder
  3. Edit the file /home/pi/navit_src/build/navit/navit.xml and search for the entry:
       <mapset enabled="yes">
           <map type="binfile" enabled="yes" data="/home/pi/.navit/Romania.bin"/>
       </mapset>
  4. Add your map name here like this:
       <mapset enabled="yes">
           <map type="binfile" enabled="yes" data="/home/pi/.navit/Romania.bin"/>
           <map type="binfile" enabled="yes" data="/home/pi/.navit/new_map.bin"/>
       </mapset>

Setup the GPS receiver
  1. For USB devices. After plugging the device into the usb port type dmesg and you should see somewhere that a new device was mapped on /dev/tty... Most probably the file name would be /dev/ttyACM0.
  2. For Serial(UART) modules. The device will have the file name as /dev/ttyAMA0.
You can test that the device is connected to a file name by calling cat/dev/ttyAMA0, for example and you should see some NMEA output.
Now, copy this file name and put it in the file /home/pi/StartCarPC in the section:
    # Start gpsd
    # /dev/ttyAMA0 - RPI serial port
    # /dev/ttyACM0 - usb port
    sudo killall gpsd
    gpsd /dev/ttyAMA0

Voice configuration for Navit
Each time a road indication has to be made, Navit will execute the file /home/pi/.navit/speech.sh with the indication text. This file will play a sound and the speak the indication, through speakers.
    aplay -r 44100 /home/pi/.navit/notification3.wav & sleep 0.7 && espeak -ven+f4 -s150 -a 150 -p 50 "$1" --stdout | aplay
    /home/pi/.navit/notification3.wav - the sound that will be played each time before an indication
    -ven+f4 - female voice number 4
    -s150 - speed 150 words per minute
    -a150 - amplitude
    -p50 - pitch
You can find more settings in the espeak manual
If you don't want the voice guidance you can press the speaker button in Navit and it will be turned off.

Configure the Controller
The controller can be easily used with Steering wheel controls or other physical controls in your car. To enable this controller, you have to edit the file /home/pi/StartCarPC and search for the entry:
    # Start the GPIO Remote
    #sudo opencarpc-controller /home/pi/gpio_description &
You have to change it to:
    # Start the GPIO Remote
    sudo opencarpc-controller /home/pi/gpio_description &
Now, you can set the configuration file like in this post

Change the car logo in the Home screen
If you want to put another car logo you have to edit the file /home/pi/.xmc/addons/skin.CarPC-touch/16x9/Home.xml and find the entry:
    <posx>580</posx>
    <posy>205</posy>
    <width>550</width>
    <height>550</height>
    <texture>bmw_logo.png</texture>

Here, you can set your new image instead of bmw_logo.png you can put a complete path of the new image.

Set up a WIFI connection
If you want to have internet connection, or airplay or control the whole system using the XBMC remotes, you have to setup a wifi hotspot with your phone and then use an USB WIFI dongle(I am using EDIMAX EW-7811UN dongle).
The system is configured to automatically connect to a wifi hotspot with the following settings:
    wpa-ssid "opencarpc"
    wpa-psk "opencarpc123"

You can find these settings in the file /etc/network/interfaces.

Some pictures with my setup:

Saturday, August 31, 2013

OpenElec with support for eGalax touch screen

Hi!

Lately I have tested OpenElec for Raspberry PI and found out that it is very very fast, very very small and also it has some great addons(wifi, bluetooth and more).
Speed/size features on an 512MB RaspberryPI:
  - a complete boot is less than 25 seconds
  - cpu is around 30% load
  - memory used is 32%
  - total system size is less than 300MB

Edit. You can download my build from here(contains eGalax module and XBMC patches).
Username is root and password is openelec. The touch screen calibration file should be put in /storage/touchscreen_axes_calib.

Next, I will guide you through the instructions for building(cross compile) latest OpenElec  for Raspberry PI with touch screen support.
For this tutorial let's assume that you have a Linux machine where you will work.

1. Get the latest OpenElec.
git clone git://github.com/OpenELEC/OpenELEC.tv.git

2. Add kernel touch screen module support.
Open the file OpenELEC.tv/projects/RPI/linux/linux.arm.conf and search for "CONFIG_INPUT_TOUCHSCREEN". Replace the whole text line with the following lines:
CONFIG_INPUT_TOUCHSCREEN=y
CONFIG_TOUCHSCREEN_USB_COMPOSITE=y
CONFIG_TOUCHSCREEN_USB_EGALAX=y
3. Fix ppl version in OpenElec.
Open the file OpenELEC.tv/packages/toolchain/math/ppl/meta and change PKG_VERSION from "1.1pre9" to "1.1pre10"

4. Put touch screen calibration file into the system.
Navigate to folder OpenELEC.tv/projects/RPI/ and create the file usr/share/eGalaxCalibration/touchscreen_axes_calib. This file should have the following contents:
calib_x_d=-21;calib_x_fact=0.658097686;calib_y_d=-50;calib_y_fact=0.408626561;swap_axes=0;click_confines=8
To set up these values please visit this post(at section 4).
This step is not needed any more, because you can use the calibration addon to calibrate your screen.
Get the calibration addon from my Downloads folder and put it in /storage/.xbmc/addons/

5. Put XBMC 12.3 patch.
Get my latest patches from here and put them in the folder OpenELEC.tv/packages/mediacenter/xbmc/patches/

6. Build OpenElec.
Navigate to OpenElec folder and type:
PROJECT=RPi ARCH=arm make -j3
-j3 option is to use parallel build(if you have more than one cpu's set this number as nb_cpus+1). This option will speed up the build process.
The build process will take couple of hours, but you have to come back once(in the first 10 minutes) and press ENTER for the kernel touch screen modifications to be approved.

7. Install or Update your OpenElec card.
Go to OpenElec build instructions page for RPI and follow the "Install instructions" chapter.

Have fun!

Tuesday, August 6, 2013

Car PC project(August 2013 update)

This is an update for my CarPC project.
You can download the latest image from the link on the top right corner of this blog(username:'pi', password:'a').
The main features are:
Hardware:
Software:
[Operating System]
    - Raspbian Wheezy 9.February.2013
    - Custom kernel 3.6.11
        - eGalax touch screen module
        - si470x usb radio module
        - snd-usb-audio module

[Media Center]
    - omxplayer
    - XBMC 12.2 Frodo
        - media formats supported:  listed here
        - sources with objects build on 27.July.2013
        - skin: CarPC-touch(download current version)
            - system shutdown button(safely stop xbmc and safely halt)
            - reload skin button
            - switch to camera view button
        - modified spectrum analyzer(OpenGL with no rotation)
        - eGalax touch screen calibrated
        - eGalax touch screen click&drag fix
        - black rectangle behind XBMC removed
        - patch to add getMousePosition feature to xbmcgui module(used to redirect clicks from the Navigation skin page to X11 using xdotool)

[Navigation]
    - Navit build from source
    - Zoom In, Zoom Out buttons
    - Click sent from XBMC to X11 (Navit Window)

GPS Setup
1. Connect GPS module to UART TX, UART RX, GND and 3.3V or on a usb port.
2. If you are using an UART GPS module, as I did, use this tutorial or any other to setup UART communication.
3. Connect GPS to gpsd:
sudo apt-get install gpsd
gpsd /dev/ttyAMA0

Adding maps to Navit
In order to add new maps to Navit, there is a simple process. First, go to Navit Planet Extractor and download your desired area file(this will be a .bin file).
After this, transfer the file to your Raspberry PI in the folder /home/pi/navit_export/build/navit/maps/. Here, you should also update the existing .xml file and add another entry for your new map. My .xml file is looking like this:
<map type="binfile" data="$NAVIT_SHAREDIR/maps/osm_bbox_11.3,47.9,11.7,48.2.bin" />
<map type="binfile" data="$NAVIT_SHAREDIR/maps/osm_bbox_20.3,43.5,29.9,48.4.bin" />
You can rename your .bin files for easier management

Car Modding
I had to relocate my original Radio/CD player in the trunk and keep it set on aux input source. This included buying about 60m of wires and also harness:
1. Metra 71-9003 Bmw Mini Factory Radio OEM Wire Harness
2. Scosche VW03B 2002+ Vw Audi BMW Radio Stereo Harness

 front without OEM Radio/CD player
trunk with relocated OEM Radio/CD player
Mounted Raspberry PI in the armrest
Safety:
    - The wires are 2mm in diameter with good insulation, resistant at temperature variations
    - I have added fuses(1.5A for the radio, 1A for Raspberry PI, 1A for display, 0.1A for reverse camera trigger, 0.1A for reverse camera video signal)

Bugs:
     - sound pops(will soon disappear by using this hdmi to hdmi and audio splitter)
    - Navigation is behind Video Player -> Navigation isn't visible while playing videos(this isn't a big issue)

Friday, July 12, 2013

CarPC first build

Hi!

After working a lot at my CarPC project I have decided to take a break and post about it.

A short preview is here:

You can download the latest image from my Downloads page in the top right corner of this blog.
If you want to build it by yourself please follow my previous tutorials but replace the three patches with the single patch from here, which is for XBMC12.2. Also read my previous post to find how to calibrate the screen axes.

Features:
  • auto start XBMC
  • eGalax touch screen support with configurable greater area for touch event(8 pixels)
  • improved skin with larger buttons and smooth transitions(link for the skin)
  • System Power OFF button
  • usbmount enabled(so usb MSD's are plug and play)
The new calibration file contains one more entry: click_confines which defines the area for XBMC to distinguish between click and drag actions(touch moves less than 8 pixels before release than action is click, else the action is drag).

Have fun!
Andrei

Saturday, January 19, 2013

Adding 7inch display with touchscreen to Raspberry PI

Hi!

First thing I got in mind when seeing Raspberry PI was "car PC project".
The targeted display was 7 inch with touchscreen. I have found a lot of displays on Ebay.

I have got myself one for 85 dollars with free shipping(this; if it is not available any more you can search "reversing driver board hdmi" on ebay and you will find others). The display driver board has hdmi input and an on board resistive touchpanel with usb controller board.

It took less than a month to receive it(in Romania). After unpack, it worked out of the box with Ubuntu 12.10(display + touchpanel) and with Windows, but for Windows I had to install some drivers also received in the package.

I have installed latest Raspbian image on a SD_Card and tried it on my Raspberry PI model B, but the touchpanel didn't show any input. After searching a lot I have decided that I have to recompile the raspbian kernel and add support for touchpanel. This sounded very new to me but it seemed to be an easy task.

First thing, I have run lsusb to see the touch controller type(on RaspberryPI):
pi@raspberrypi ~ $ lsusb
Bus 001 Device 002: ID 0424:9512 Standard Microsystems Corp.
Bus 001 Device 001: ID 1d6b:0002 Linux Foundation 2.0 root hub
Bus 001 Device 003: ID 0424:ec00 Standard Microsystems Corp.
Bus 001 Device 004: ID 1c4f:0002 SiGma Micro Keyboard TRACER Gamma Ivory
Bus 001 Device 005: ID 0eef:0001 D-WAV Scientific Co., Ltd eGalax TouchScreen
Last device is the touch controller, from eGalax.

Edit: If you don't want to build the kernel by yourself, you can download mine from here. After his, you have to replace file /boot/kernel.img and /lib/firmware and /lib/modules/ on the SD card.

Building a new kernel(in UBUNTU 12.10).
Get kernel sources.
wget https://github.com/raspberrypi/linux/archive/rpi-3.6.y.tar.gz
tar -zxvf  rpi-3.6.y.tar.gz
Install some dependencies.
sudo apt-get install git libncurses5 libncurses5-dev qt4-dev-tools build-essential
Install toolchain.
The best way to do the kernel compilation is on a Desktop/Laptop machine, which will be much more fast than on the Raspberry PI. I have did this in Ubuntu 12.10:
sudo apt-get install gcc-arm-linux-gnueabi
After download of the kernel archive has finished unpack it and then navigate with terminal to the extracted folder.
Be sure thaat the sources objects are cleaned. Type:
make mrproper
Create a folder for the generated kernel:
mkdir ../kernel
Generate the .config file:
make O=../kernel/ ARCH=arm CROSS_COMPILE=/usr/bin/arm-linux-gnueabi- bcmrpi_cutdown_defconfig
Configure the kernel:
make O=../kernel/ ARCH=arm CROSS_COMPILE=/usr/bin/arm-linux-gnueabi- xconfig
In the opened window press the | button to collapse all items. Then, navigate to Device Drivers->Input Device Support->TouchScreens and select it. Here, be sure to check also your touch screen controller if it is other than eGalax, or if it is not selected. Now press save.

With the changes being made you can now compile the kernel:
make O=../kernel/ ARCH=arm CROSS_COMPILE=/usr/bin/arm-linux-gnueabi- -k -j3
Note: -j3 option from the end means to enable parallel build. The number should be number of cpu cores + 1(I have dual core cpu).

The build took about 20 minutes on my PC. After the build completes, you will have the new kernel in ../kernel folder, created above.

Create the kernel image:
cd ../
git clone git://github.com/raspberrypi/tools.git
Note: You need to have git installed.

Navigate to tools/mkimage and then run:
./imagetool-uncompressed.py ../../kernel/arch/arm/boot/Image
This command will generate the kernel image(kernel.img file).

Build modules:
Go back to the ../kernel/ folder.
mkdir ../modules/
make modules_install ARCH=arm CROSS_COMPILE=/usr/bin/arm-linux-gnueabi- INSTALL_MOD_PATH=../modules/

Replace the kernel:
Get latest firmware:
wget https://github.com/raspberrypi/firmware/archive/next.tar.gz
tar -zxvf next.tar.gz
In the small partition(/boot) do:
  • replace /boot/bootcode.bin with firmware-next/boot/bootcode.bin
  • replace /boot/kernel.img with the previously created kernel image
  • replace /boot/start.elf with firmware-next/boot/start.elf
In the big partition(/root) do:
  • replace /lib/firmware with <modules_builded_above_folder>/lib/firmware
  • replace /lib/modules with <modules_builded_above_folder>/lib/modules
  • replace /opt/vc with firmware-next/hardfp/opt/vc/
Now your card should contain the new image. Safely eject your SD card and then unplug it from the card reader and then put the card in Raspberry PI and start X(startx). Plug the touch controller in one usb and check if you can move the cursor(or you can start with he touch already plugged in).

After I have started X, my touch input was working but the axes were switched and also not calibrated.

Calibration for the touchscreen(in Raspberry PI). 
Note: The next steps are performed in the Raspberry PI's Debian Wheezy. This is a method for calibrating the touchscreen which will work just for Xserver and Xserver based applications.

Install xinput_calibrator.
Install some dependencies:
sudo apt-get install libx11-dev libxext-dev libxi-dev x11proto-input-dev
Download xinput_calibrator somewhere in the Raspberry PI's folder structure.
wget http://github.com/downloads/tias/xinput_calibrator/xinput_calibrator-0.7.5.tar.gz
Unpack it and then navigate to the unpacked folder and then install it using:
./configure
make
sudo make install
After this step you should run xinput_calibrator(from Xserver terminal console: first startx then open console and then run it).
xinput_calibrator
Follow the on screen instructions(touching some points on screen) and after calibration is complete you will receive a message like this:
Calibrating EVDEV driver for "eGalax Inc. USB TouchController" id=8
    current calibration values (from XInput): min_x=1938, max_x=114 and min_y=1745, max_y=341

Doing dynamic recalibration:
    Setting new calibration data: 121, 1917, 317, 1741


--> Making the calibration permanent <--
  copy the snippet below into '/etc/X11/xorg.conf.d/99-calibration.conf'
Section "InputClass"
    Identifier    "calibration"
    MatchProduct    "eGalax Inc. USB TouchController"
    Option    "Calibration"    "121 1917 317 1741"
    Option    "SwapAxes"    "1"
EndSection

For Raspbian you have to create a file:
sudo nano /usr/share/X11/xorg.conf.d/01-input.conf
Add in this file the content above(starting with Section "InputClass" line) and then save it(ctrl+O).

Note:
Please make sure that you don't have sections like
MatchProduct    "eGalax Inc. USB TouchController"
in other files from /usr/share/X11/xorg.conf.d/ folder(highest number files are processed last, thanks to Jasmin).

Now touchscreen should be calibrated and after reboot it will keep the settings.
Once, I had to run xinput_calibration again in order to have the pointer to the desired points. You can update the numbers given by the xinput_calibration utility in the
usr/share/X11/xorg.conf.d/01-input.conf file in order to have the best calibration at boot.

Soon I will add some pictures.

Andrei